Attribute
Overview
An Attribute is a property definition and can be related to an Asset, Material or Order.
Creating a new Attribute
Go to Settings > Configuration > Attributes > Create

Fill out the necessary fields
Fields
Name *
Here you will input the name of the site. This is mandatory.
Description
a text description of the attribute.
Display Order
defines the order in which the entry will be displayed in the selection.
Order / Order Number Attribute
sets the attribute at the order level.
Asset Attribute
sets the attribute at the asset level.
Material Attribute
sets the attribute at the material level.
Data Type *
Boolean - value can be true or false.
String - value is in string/text format
Number - value is in numeric format.
Link - value is a link to a file or webpage
Click the Save and close** ** button to finalise.
It is possible to maintain the same attribute in more than one place. When that happens TilliT will prioritise and overwrite the value from the most aggregate to the most detail. For example, if you set a specification setpoint on the material level, i.e. Alcohol level, and then set the same attribute on the Order level, TilliT will use the order level as opposed to the material.
This allows for some interesting ways to manage standards, deviations and exceptions.
An attribute can be maintained during order or material creation via API and can be updated via an activity form using the Update Attribute item type.
Attributes can be referenced in Calculations, Read only notes, Active Item Expressions, Hidden Expressions and Tolerances.
Asset Attributes
Once you've defined an attribute, you'll want to start using them. Assets often have attributes for them to help define behaviour on specific. For example, if you have multiple beverage fillers on a line, each one may have a differing number of filler heads.
To apply an attribute to an asset, start by going to Settings > Asset Hierarchy > Assets:
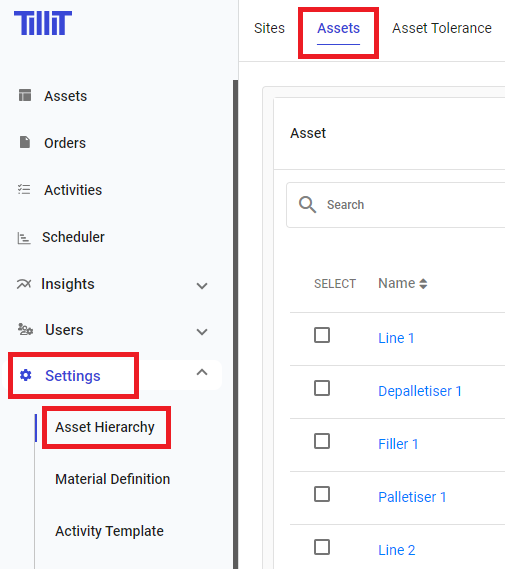
Next, click on the Asset you want to apply an attribute. In this case, Filler 1. This will open Filler 1's configuration. We need the Asset Attribute tab:
In the Asset Attribute tab, we click Create

You will be presented with a drop-down list of all Attributes defined as Asset Attributes where you can scroll or search for the attribute you require:
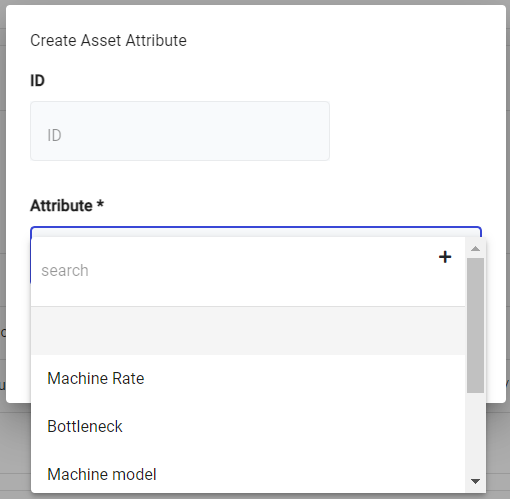
Once selected, another field will appear based, to input the value of the attribute.
In this example, _Number of Heads _ is a number type and therefore requires a numeric value:
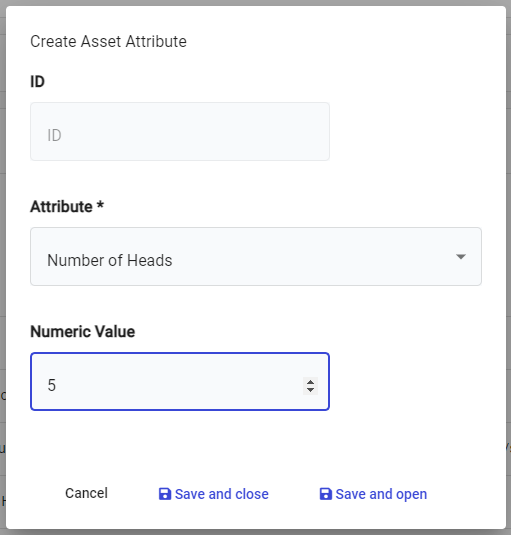
Click Save and close to finalise.

Now this attribute will be defined as 5 on all orders that run on Filler 1.
This attribute will remain the same on every order that uses this asset. However, if you ever want to give operators the option to update an Asset Attribute, this is possible by using Update Asset Attribute in an activity. Caution should be used when doing this as this will affect any order using this asset, present and future.
Material Attributes
Similar to Assets, Materials can also have attributes to define behaviour.
For this example, I want to add an attribute called Back Label to a wine product to define that this product requires a back label on the bottle on every order that produces this material.
Start by going to Settings > Material Definitions > Materials:
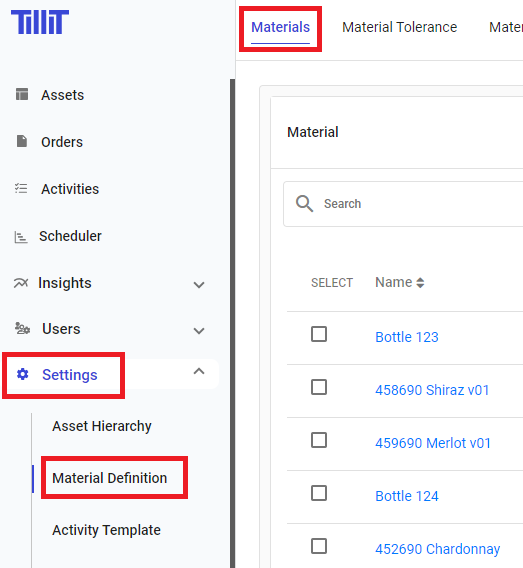
Click on the material you wish to apply an attribute to. In this example, we're going to open 458690 Shiraz v01.
Clicking it opens the material's config. We will need the Material Attribute tab:
In the Material Attribute tab, we click Create:

You will be presented with a pop-up, asking you to select an attribute from the a drop-down menu:
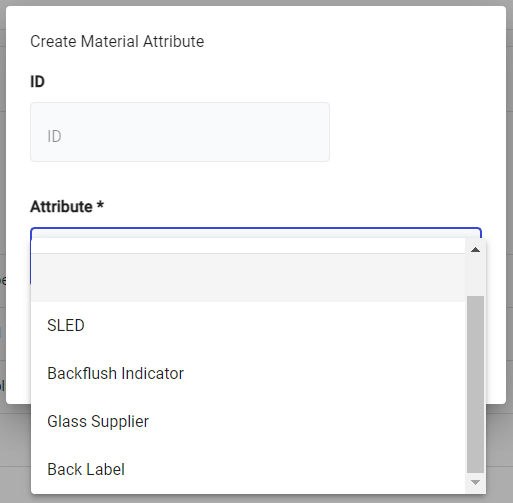
Once selected, a value needs to be set. This example is a Boolean type, so we set the value as true by ticking the box:
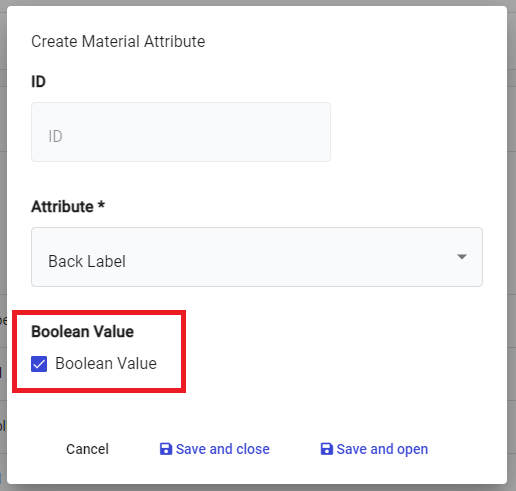
Click Save and close** ** to finalise.
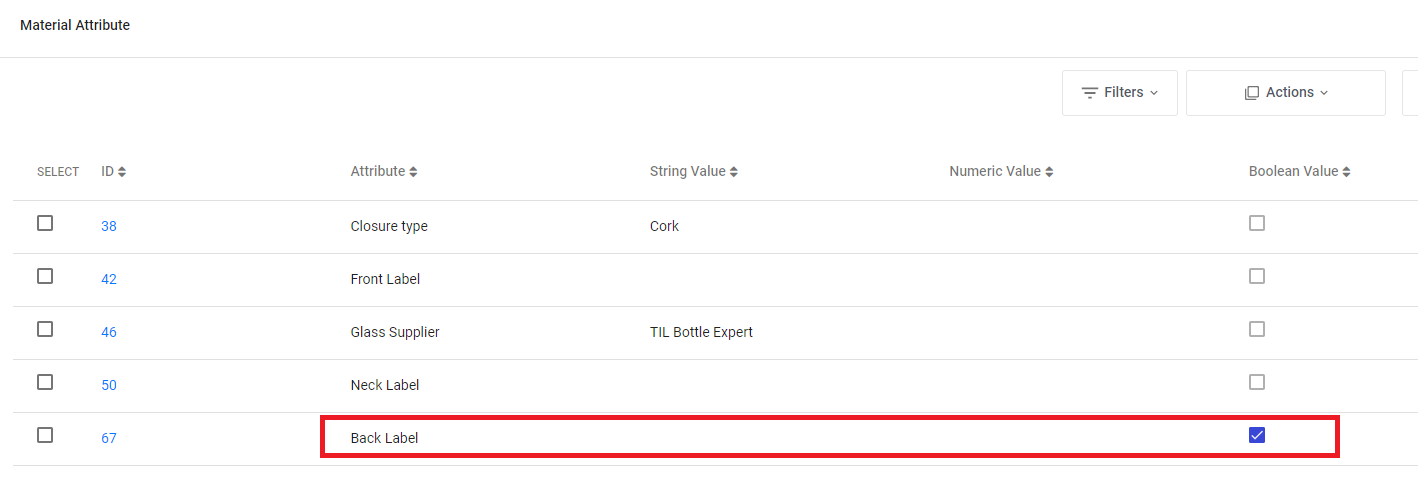
Now this attribute will be defined as true on all orders that use the 458690 Shiraz v01** ** material.
This attribute will remain the same on every order that uses this material. However, if you ever want to give operators the option to update a Material Attribute, this is possible by using Update Material Attribute in an activity. Caution should be used when doing this as this will affect any order using this material, present and future.
Order and Order Number Attributes
The most common use an attribute as in the form of Order Attributes. These are Order-specific, meaning they cannot be accessed on any order, other than the one it is attached to. On the other hand, the Order Number Attribute will override all orders with the same order number, not just one that was assigned.
Order Attributes will generally be loaded as the order is loaded into TilliT, either via the Excel Add-in or the API. However, it is also possible to set an Order Attribute in an activity using Update Order Attribute.
If an attribute is already configured on an asset or material, but an Order Attribute is also assigned, the Order Attribute value overrides the Asset or Material Attribute value.
For example, the default value for what temperature to bake something (180°C) may be set on a material attribute. However, if there is a good reason to bake a a slightly higher temperature, you could use an activity with an Update Order Attribute item to set this new value (190°C) against an order attribute. The new Order attribute will then override the material attribute. Now any tolerances that reference this attribute will have been updated dynamically.
The Attributes Hierarchy
An important thing to note when setting up Attributes is the priority of the attribute type. A good general rule to remember is that the more specific the attribute data is, e.g an Order attribute is more specific than an encompassing Asset attribute, it will override the broader one.
Below is a general guide where the top most will override the bottom ones. Order Attribute has the first priority, Order Number second and so on until Asset has the least priority.
Source
Priority Order
Order
1
Order Number
2
Material
3
Order Component
4
Material Component
5
Asset
6
Last updated
Was this helpful?